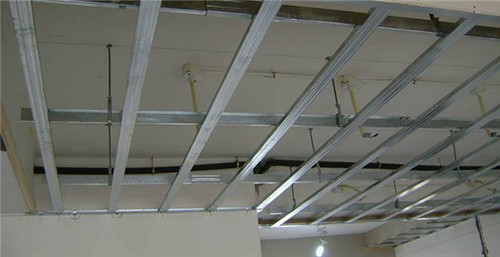
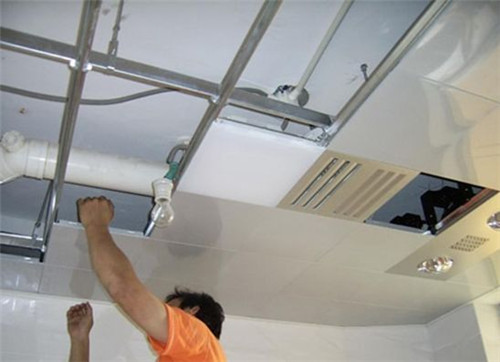
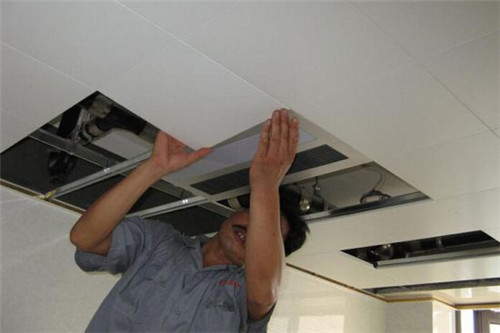
The integrated ceiling not only has a simple and beautiful appearance, but also has multiple functions of heating and ventilation, so it is widely used in kitchens and toilets. However, with the continuous improvement of the integrated ceiling, its installation is now customized for the whole house. So, what are the installation methods for the integrated ceiling ? The following small series introduces you to the four major installation methods for your reference. Introduction of integrated ceiling installation method 1. Integrated ceiling installation method-installation of six screws a. First of all, measure the installation size, and then drill the expansion tube Screw on the corresponding ceiling. It should be noted here that the height between the suspended ceiling and the roof should not be less than 625px, and the screw should be perpendicular and firm to the ceiling. 6 The root screws must be kept parallel. b. Then use an electric hammer to make an average of six holes in the ceiling, and then measure the distance from the top to the corner line. After the hole is made, screw a nut on one side and then the expansion screw, screw the nut on the other side, then put the main keel hanging piece, and then screw in a nut to fix it. c. After that, screw the connection between the screw and the expansion screw into the hole, and connect the large ceiling to the screw with a diameter of 6mm. Screw the nut into the screw, and then put it into the big hanging piece, then screw into the nut, and so on, the six screws are installed. 2. Integrated ceiling installation method-keel installation a. Clamp the main keel on the hanger, and then cut off the required size. Pay attention to keep the main keel stuck parallel. b. The next step is to put the triangle hanger into the triangle keel and fix it on the main keel. Keep the distance between each keel at 300mm. If you want to install a range hood, you must arrange the air outlet duct of the range hood in front of the gusset. When installing the keel, it should be noted that each triangle keel hanger stuck to the main keel has the opposite direction, so that the installation will not swing afterwards. 3. Integrated ceiling installation method-install gusset a. After the triangular keel is fixed, insert the connector into it, then cut the required length and insert it into the other end of the connector, so that the insertion connection will be more stable. b. When installing the gusset, lift up the membrane on the four sides of the gusset, and then install according to the arrows on the membrane. It should be noted here that the gussets in the first row should be cut, and symmetry and aesthetics should be paid attention to when cutting, and the cut should face the wall. c. Afterwards, the buckle plate should be clamped in the triangular keel and the buckle plate should be fastened, so that the buckle plates in the first row are installed, but the spacing between the buckle plates should be 0, and the four corners should be in a "ten" shape The height should be consistent. 4. Integrated ceiling installation method-install electrical appliances a. After installing the gusset plate, start to install the electrical appliance. At this time, insert the circlip into the circular hole, and then insert the mechanical screw into the circular hole on the electrical box and lock it. Then put the electrical box on the keel and fix it. b. The next step is to connect the corresponding function wires, and then conduct the power-on test for the switch. c. Finally, check the overall effect of the installation to see if the appliance can be used normally and whether the gusset is flat. Summary of the article: The above are the four major tricks for the integrated ceiling installation method introduced by everyone. Only after you have a good grasp of these methods will the integrated ceiling installation be more durable. If you want to know more related knowledge, you can continue to pay attention to our website. What, the decoration still uses his own money? ! The Qi family is decorated in installments, with an ultra-low annual interest rate of 3.55% and a maximum loan of 1 million. Apply now to enjoy the discount If you are interested in brand cooperation, content cooperation, and advertising of this website, please send an email to :. Copper nuts made of all kinds of embossed wire (usually lead brass, such as H59, 3604, 3602). Our daily contact with the embedded knurled copper nuts are processed by precision automatic lathes. The reference standard of embedded knurled copper nut comes from GB/T809, but the technical parameters of all kinds of embedded nuts produced by our company exceed the relevant indexes required by the national standard. Brass Nut,insert nut,knurled nut,injection nut,hex nut Shenzhen Lanejoy Technology Co.,LTD , https://www.szstainlesssteelwiremesh.com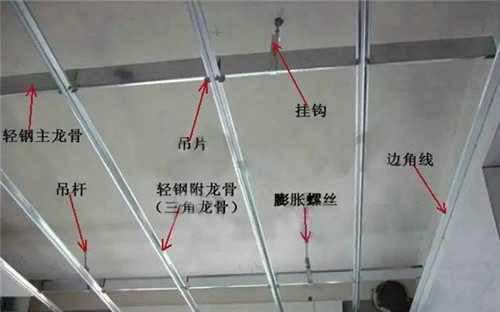
Knurling copper nut is mainly used for hardware Spring, shaped spring, craft gift spring, battery spring, spring antenna,key ring, phosphorus copper spring CNC automatic lathe turning parts (copper car parts, iron, aluminum car parts), metal stamping parts, electronic parts, iron shaft, single Rachel,Rachel, iron pin, non-standard screw nut,fittings,fasteners, wire forming (wire card holder, Model aircraft landing gear, S hook, R latch, triangle buckle, D buckle) and other hardware products, belonging to the copper nut series.