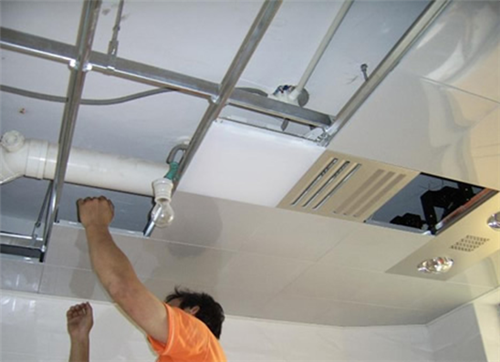
Ceiling is a very common material in the decoration, and the ceiling material is divided into many kinds. For example, there are gypsum board ceilings, glass ceilings, aluminum buckle ceilings, etc., and different kinds of ceiling decoration effects and construction steps are also different. Then what are the ceiling plate installation steps and what should you watch out for? Learn with Xiaobian! 3, determine the keel position line. Because the keel is mainly used to support the shape and fixing structure of the external decorative materials, in the case that the size of the plastic buckle has been determined, in order to ensure the integrity of the installation, the structural dimensions and position lines of the keel are determined according to the panel specifications, and will be determined. The location line is above the baseline. 6, side keel installation. The side keel should be installed close to the main keel. After the main and side keels are installed, check the flatness and firmness of the keel. 7, plastic buckle plate installation. The buckle plate is buckled on the keel once in parallel and connected with a special connecting piece. It should be noted that when the last piece of the plate is installed, it must be cut according to the final actual size with a cutter, and the panel is slightly bent. Load it and seal it with a bead on both sides. Ceiling installation need to pay attention to what 1. Pay attention to the installation order: When installing the ceiling of the buckle board , the kitchen must first fix the hose flue of the hood, determine the position of the hood, and then do the ceiling. The bathroom must be equipped with the bathroom heater, the exhaust fan, and then the ceiling. 2. Pay attention to the installation dimensions: Before installation, please inform the installation worker about the location of the lamp, the Yuba, and the discharge. In order to determine the position of the opening, the Yuba keel must be installed on its own, or a self-made simple wooden frame. 3, note the depth of drilling: square plate to use light steel keel, slats with aluminum keel or galvanized keel, according to the measurement of construction drawings, drilling depth of 3 ~ 4cm is appropriate to prevent damage to the wire and waterproof layer. Pay attention to the spacing of the keel: arrange the keel according to the size of the gusset plate, the distance is 50~60cm, the distance from the main keel end is no more than 30cm, otherwise the boom should be added to avoid falling. 4. Pay attention to the panel connection: The panel and the keel should be closely connected, the surface should be flat, and the joints should be free from pollution, missing corners, delamination, and warping angles. The gap between the corner line and the wall should also be small. Uniform. Xiao Bian concludes: What are the installation steps for the gusset ceiling and what should be paid attention to in the ceiling installation? Xiao Bian briefly introduces this and hopes to help everyone! The buckle ceiling is also a kind of ceiling material commonly used in decoration. Therefore, it is best for you to understand some of the installation steps and precautions. You may also use it in the decoration. Ceiling installation The LED emergency driver for panel can be customized from 3W-100W with half power emergency output for emergency lighting 60-300mins. Automatic lighting up when main power failures. Suitable for LED fitting with external led driver. With internal or external lithium battery back up. Widely using for office, building, warehouse, school, hospital, workshop etc. Emergency Led Driver,Emergency Backup Driver for led,Emergency Light Driver,Emergency Driver For Panel,led light emergency power supply Foshan Nai An Lighting Electric Co.,ltd , https://www.naipsled.com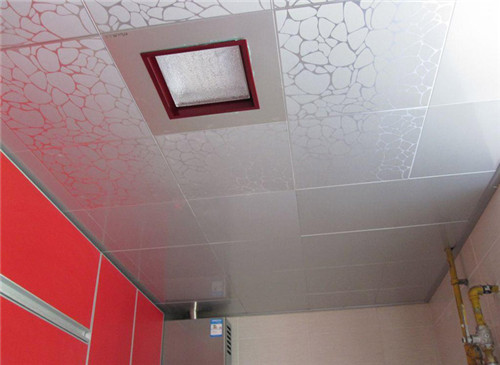
1. To install the buckle ceiling , the first step is to determine the ceiling installation position, ie ceiling height. Generally, the ceiling should not be too low, and the height is too low to make the space appear to be depressed. After determining the installation height, use the ink line to raise the elevation of the surrounding wall surface. The reference line should be clearly marked.
2, according to the ceiling design, ceiling area to determine the size of the buckle plate. 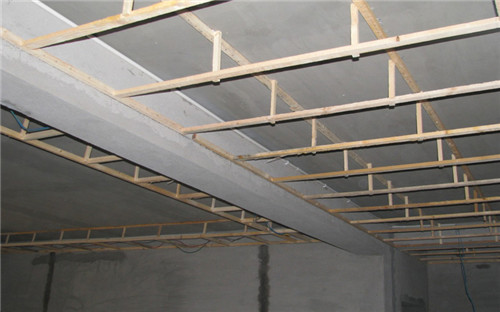
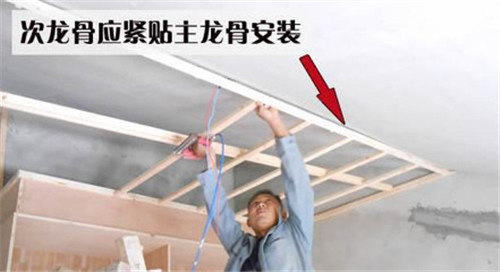
4, the main keel installation. The main keel ceiling spacing is selected according to the design recommendation series. The middle part should be arched. The keel arching height is not less than 1/200 of the room surface span. Correct the position and height of the main keel immediately after installation. Pull out the vertical and horizontal elevation control lines, starting from one end, and adjusting the suspension height of the boom while mounting to control the leveling of the dragon skeleton.